To begin the configuration of the module you need to start by inserting the Utility QSX Module into a new or existing Process Map. Once you have finished your configuration(s) complete the remainder of your Process Map and begin your capture processing.
With your “Batch Profile” or “Document Type” open, we will move into the process of adding and configuring the QSX.
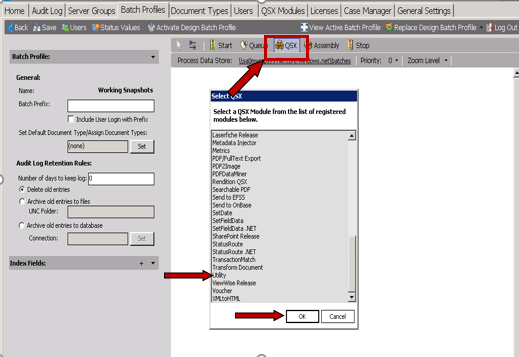
1. Place the “Utility QSX” on the “Batch Profile” or “Document Type” by clicking on the “QSX Icon” and then clicking in the process map. The QSX Selection Window will open and select the “Utility” and then “OK” to continue.
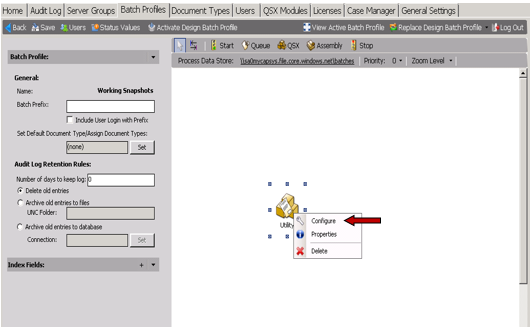
After you have placed the “Utility QSX” icon on the process map, right-click on the icon and select “Configure”.
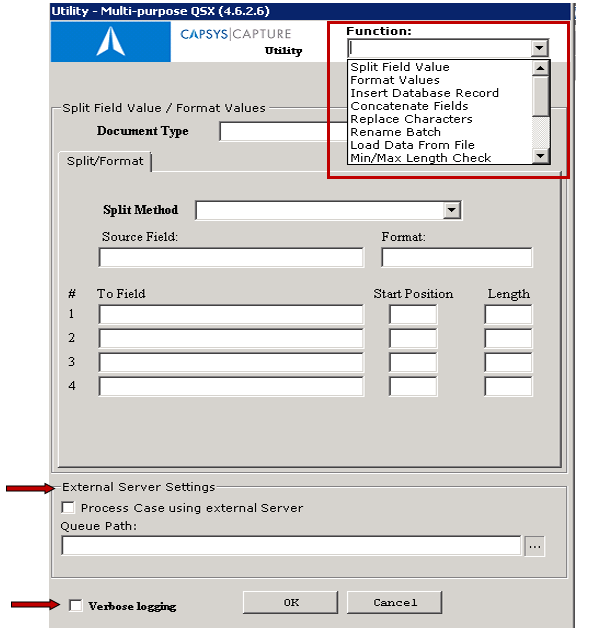
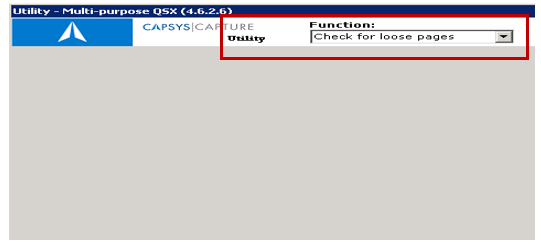
2. The following dialog box will appear, select the pull down “Function Menu” and the option you would like to configure, and after your selection is made you will then be taken to the input screen for your specific selection.
NOTE: There are 2 options at the bottom of the configuration screen. The first is the ability when your installation is CAPSYS Enterprise, you can select the option to process cases passing through the Utility QSX using the Out Of Process Method.
The second you can select the “Verbose Logging Box” from the initial screen or any of the other option screens to enable this function. This function will create a more robust and detailed audit log.
This option/function provides the user to separate information from one (1) field up to four (4) other fields. Much of this process is completed before the automated portion of the processing is handled. This option/function is used to eliminate manual entry data.
1. Select the pull down menu and then the value in “Document Type”.
2. Select the “Split Method” of either “Ordinal” or “Delimited”. If you select “Delimited” an additional box will open, you will need to determine what character is being used and populate the field accordingly.
A. When using “Ordinal” as the Split Method you need to complete the “Start Position” and “Length” Fields.
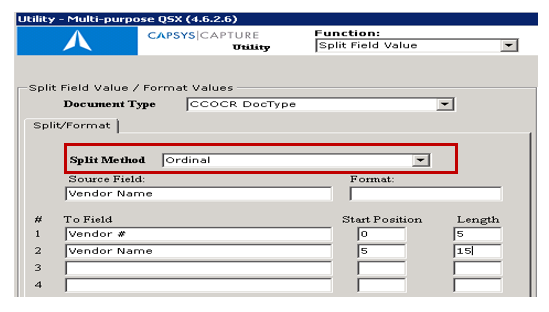
B. When using “Delimited” as the Split Method you need to complete only the “Start Position” Field along with the Delimiter to be used.
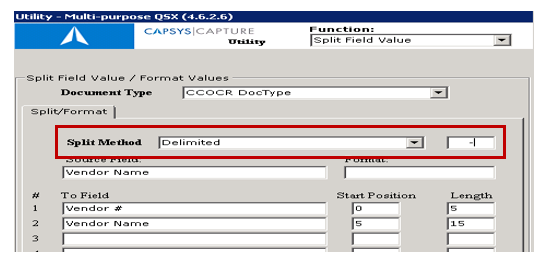
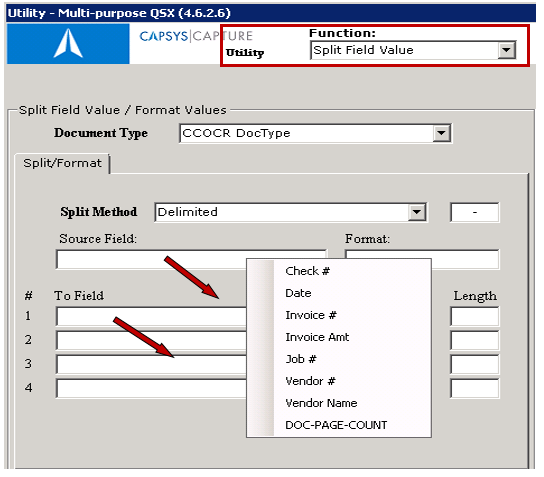
3. Right click in the “Source Field” and select the associated data field available to you (”Document Type” must have a value for this option to work).
4. The “Format Field” is NOT used in the “Split Field Value”.
5. In the “To Field” right click on the first instance and select where you would like the information to be placed (”Document Type” must have a value for this option to work), this can be done up to four (4) times, if additional instances are needed you will need to add an additional “Utility” QSX into the map and configure it accordingly.
6. Select “OK” and your “Split Field Value - Utility QSX” is ready for use.
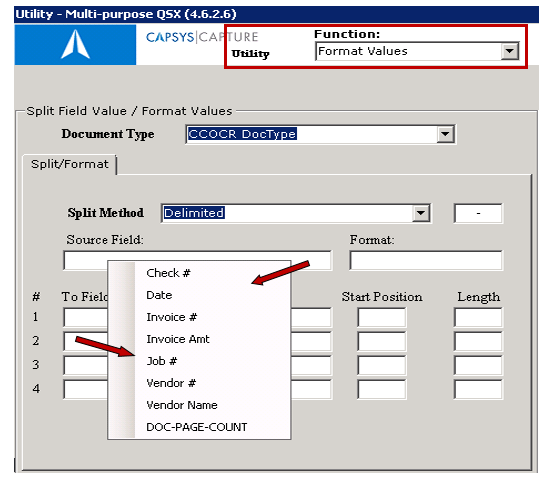
This option/function provides the user with a method to manipulate data for downstream processing . It also allows for a formatted value to be used for a specific purpose within an organization.
1. Select the pull down menu and then the value in “Document Type”.
2. The “Split Method” is NOT used in the “Format Value Function”.
3. Right click in the “Source Field” and select the associated data field available to you (“Document Type” must have a value for this option to work).
4. In the “Format Field” create the format string (see “Number Formatting”) you would like the information to appear as. Examples of strings include “123456789”, 123-45-6789, Date|yyy-mm-dd or Number|{0:9999} .
5. In the “To Field” right click on the first instance and select where you would like the information to be placed (”Document Type” must have a value for this option to work.
6. Select “OK” and your “Format Values - Utility QSX” is ready for use.
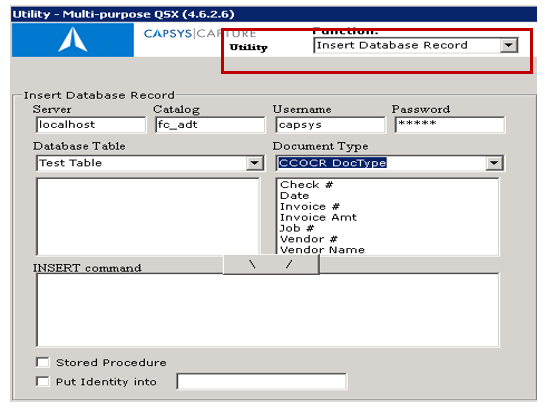
This option/function provides the ability to take information from the capture process and insert it into databases for future use within the organization.
1. Insert the server name and instance in the “Server Field”.
2. Insert the database name in the “Catalog Field”.
3. Insert the “Username” & “Password” for the Server/Database.
4. Select the table name from the “Database Table” pull down menu.
5. Select the “Document Type” from the pull down menu.
6. To create the “Insert Command” for
the information, select the Field in the “Database Table” and
the “Document
Type” then click the  button to complete the
command. This process can
be completed for multiple instances. In the example
below, we are placing information into database fields captured from a
document.
button to complete the
command. This process can
be completed for multiple instances. In the example
below, we are placing information into database fields captured from a
document.
7. “Put Identity into” can be used when a new SQL Record is created, which has an identity Seed Field (Auto-Increment). This value can be returned to a CAPSYS field for future or further use. This use could be a call to the Web Service to populate some remote system with the identity that results in a direct lookup.
8. Select “OK” and your “Insert Database Record - Utility QSX” is ready for use.
This option/function is used to check for cases containing loose pages prior to Export and the case into an exception queue for review.
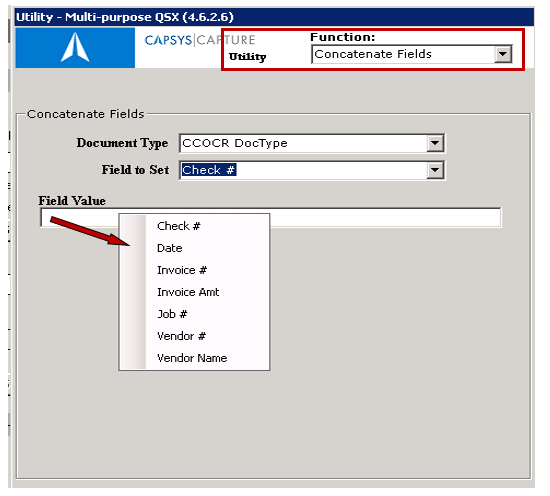
This option/function allows you to consolidate or merge fields together to create a unique index or data field as part of the output from the capture process.
1. Select the pull down menu and then the value in “Document Type”.
2. Select the field from the “Field to Set “pull down menu.
3. To create “Field Value” right click in the field and select the first and subsequent values to which will be the value populated into “Field to Set” (”Document Type” must have a value for this option to work).
For example: Document Type = “Barcode Data”, Field to Set = “Invoice Date” and the Field Value may include pieces of data needed to set the “Invoice Date” and the string could look like “@barcode1@barcode2@barcode3”.
4. Select “OK” and your “Concatenate Fields - Utility QSX” is ready for use.
This option/function gives you the ability to strip out specific characters from various fields during the capture process. It also provides a method to change an original value into a new value for use within the overall data process.
1. Select the pull down menu and then the value in “Document Type”.
2. Right click in the “Source Field” and select the field you would like to use (”Document Type” must have a value for this option to work).
3. Right click on the “Target Field” and select the field you would like to place the data into (”Document Type” must have a value for this option to work).
4. In the “Multi-Replace Delimiter Field” enter the value being used to separate values in your data. For instance a comma (“,”) or bar (“|”) may be used.
5. Enter the “Old Value” in this field, ensuring that the “Multi-Replace Delimiter” that you entered is used in this entry.
6. Enter the “New Value” in this field.
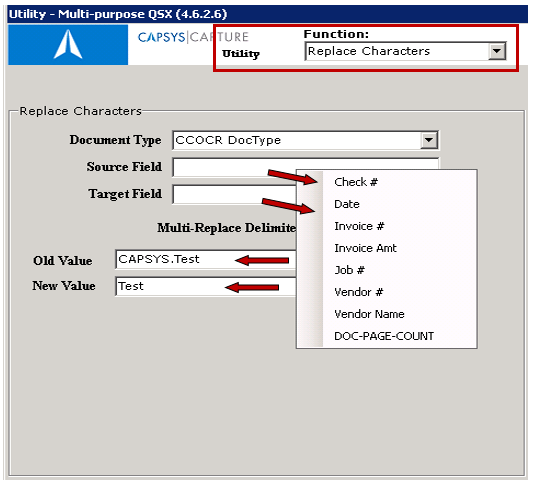
7. Select “OK” and your “Replace Characters - Utility QSX” is ready for use.
This option/function provides a method to set a batch name using specific index values.
1. Right click in the “Batch Name” and select a new name from the list provided.
2. Select the checkbox for “Clear Field after setting Batch Name” if you would like the batch name to clear the index value from the field selected for use. IN order for this to work effectively you MUST select the checkbox.
3. Select “OK” and your “Rename Batch - Utility QSX” is ready for use.

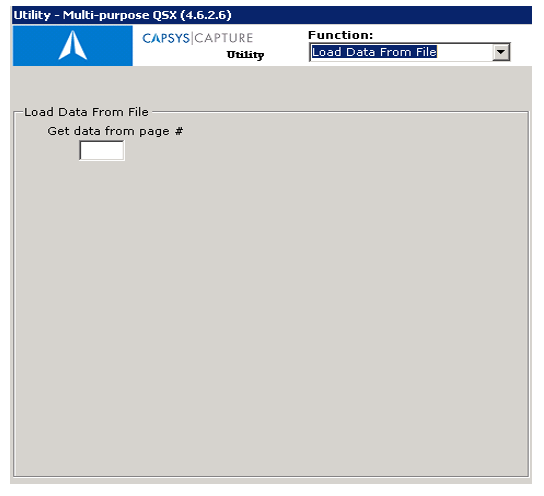
LOAD DATA FROM FILE
This option/function provides a method to allow images, text or data from a specific page within a file that can be referenced by CAPSYS. The use of this functionality requires some additional setup and configurations. Please contact Support for additional information and direction in using this functionality.
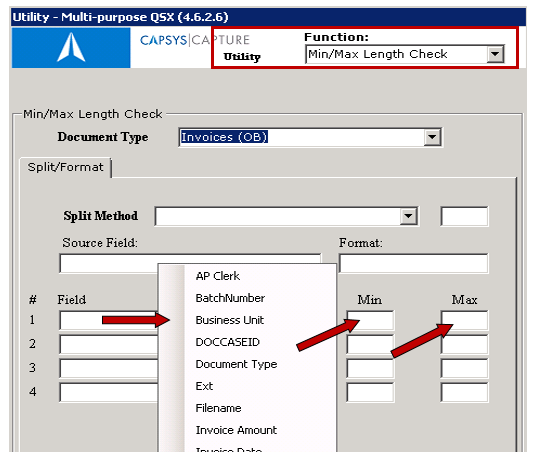
MIN/MAX LENGTH CHECK
This option/function provides a method to set a minimum, maximum or both for a particular index field.
1. Select the pull down menu and then the value in “Document Type”.
2. Right click in the “Index Field” and select the field you would like to use (”Document Type” must have a value for this option to work).
3. Add the Minimum, Maximum or both values required.
Enter the “New Value” in this field.
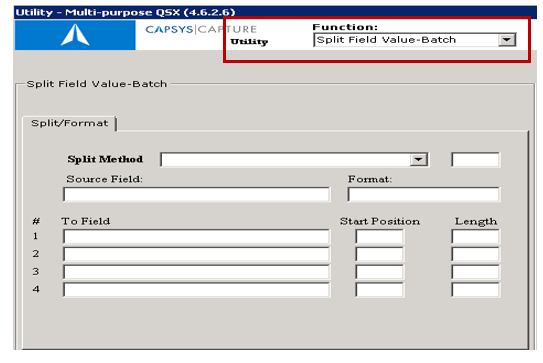
SPLIT FIELD VALUE-BATCH
This option/function provides the user to separate information from one (1) batch field up to four (4) other fields at the document level, this should not be confused with The Split Field Value Function, that is used at the document level. Much of this process is completed before the automated portion of the processing is handled. This option/function is used to eliminate manual entry data.
1. Select the pull down menu and then the value in “Document Type”.
2. Select the “Split Method” of either “Ordinal” or “Delimited”. If you select “Delimited” an additional box will open, you will need to determine what character is being used and populate the field accordingly.
A. When using “Ordinal” as the Split Method you need to complete the “Start Position” and “Length” Fields.
B. When using “Delimited” as the Split Method you need to complete only the “Start Position” Field along with the Delimiter to be used.
3. Right click in the “Source Field” and select the associated data field available to you (”Document Type” must have a value for this option to work).
4. The “Format Field” is NOT used in the “Split Field Value”.
5. In the “To Field” right click on the first instance and select where you would like the information to be placed (”Document Type” must have a value for this option to work), this can be done up to four (4) times, if additional instances are needed you will need to add an additional “Utility” QSX into the map and configure it accordingly.
6. Select “OK” and your “Utility QSX” is ready for use.
INSPECT DOCUMENTS
This option/function provides a method to set a minimum, maximum or both for a particular index field.
1. Select the pull down menu and then the value in “Document Type”.
2. Add the Minimum, Maximum or both values required for processing.
Enter the “New Value” in this field.

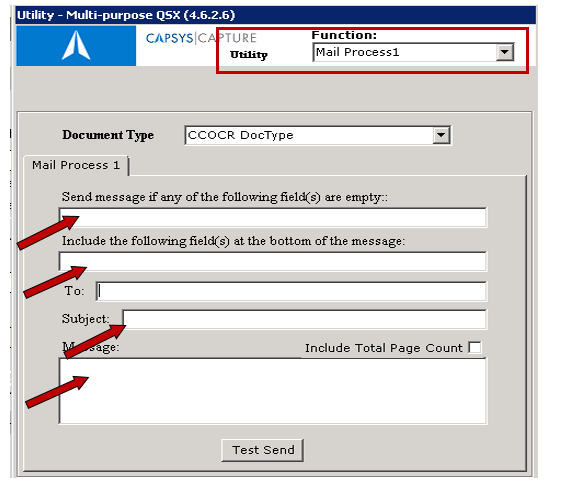
MAIL PROCESS1
This option/function provides a method to send an email message/notification regarding a specific process or batch class. Complete the following items…
1. Select the pull down menu and then the value in “Document Type”.
2. Right click in the “Send Message if any of the following fields are empty” this will provide a list of available fields to be checked.
3. Right click in the “Include the following fields at the bottom of the message” this will provide a list of available fields to be included.
4. Add a group or single email address, use commas between each address added.
5. Add a subject into the email message.
6. Free form a standard comment that will be used for the email message.
Enter the “New Value” in this field.
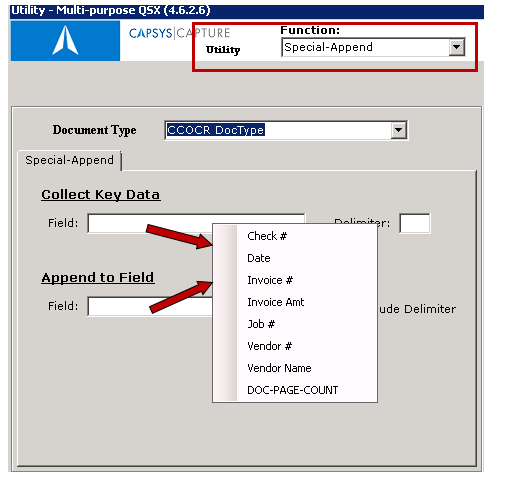
SPECIAL-APPEND
This option/function provides a method to add information from one index value into another along with a delimiter.
1. Select the pull down menu and then the value in “Document Type”.
2. Right click and select the field to get the data from, along with the delimiter if one exists
3. Right click and select the field to append the data to, and if the delimiter needs to be added as well.
Enter the “New Value” in this field.
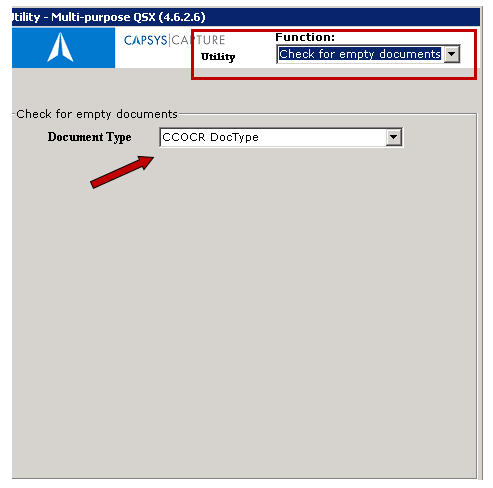
CHECK FOR EMPTY DOCUMENTS
This option/function provides a method to check documents to ensure they have a page within each.
1. Select the pull down menu and then the value in “Document Type”.
Enter the “New Value” in this field
Should you require additional assistance, please contact your authorized business partner for support.
To contact CAPSYS:
877.322.7797
To submit a support request via our Website, please visit our Support Page.
Our standard support service hours are from 8am - 5pm Central Standard Time.
Please report any defects or problems that you find in the software by sending an email to the following address: support@capsystech.com.
In the text of your email, please provide all the following information:
In addition, please attach a trace log file if one was generated. Trace logging can be turned on by setting the following registry key on the computer for which you wish to enable trace logging.
CAPSYS CAPTURE Server:
HKEY_LOCAL_MACHINE\Software\CAPSYS
TraceFile = “C:\CAPSYSTrace.log” (Note: The path specified must exist)
CAPSYS CAPTURE Web Server/Server Manager:
HKEY_LOCAL_MACHINE\Software\CAPSYS
IISTraceFile = “C:\CAPSYSIISTrace.log” (Note: The path specified must exist)
WARNING! Turning on the trace logging capability will severely impact system performance. It should be used for diagnostics only.